
The parts of a countertop: seams, miters, cutouts and support
On this page
FIELD STUDY / 01 · 24 FABRICATION DETAILS
Look closer. Think like a fabricator.
All 24 details are mapped onto the kitchen. Select a number to see the photograph or fabrication drawing here, then open the full inspection.
Every study zone is visible. Hover over or select a number for its photo or drawing; use a study filter to focus the view.
24 study points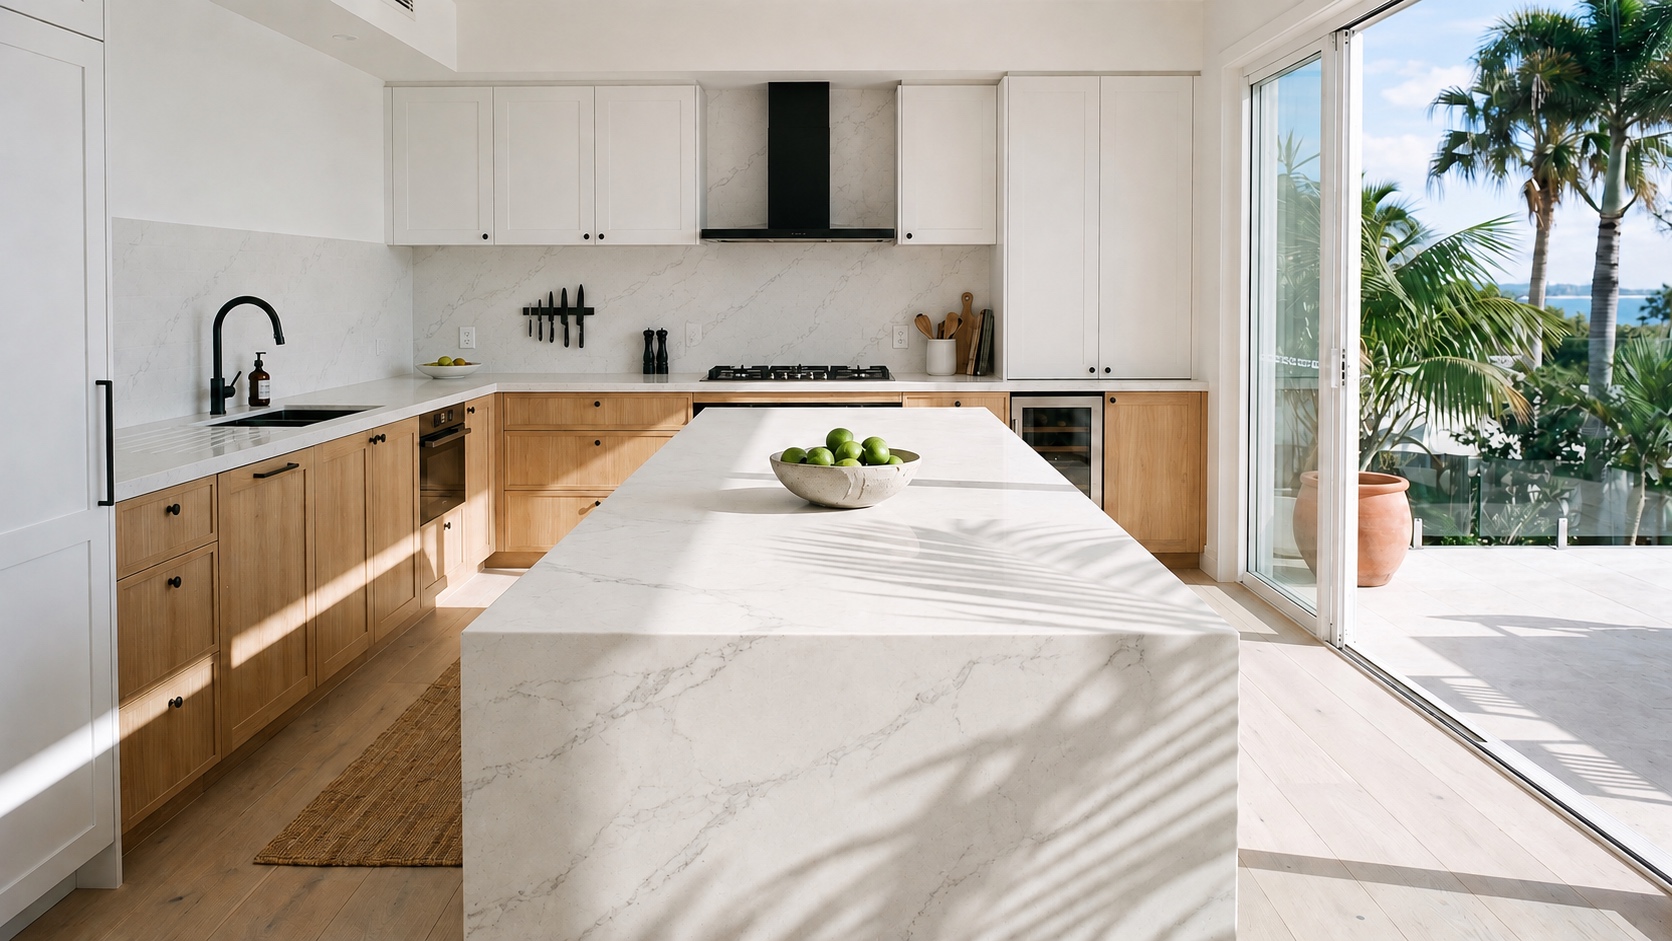
Follow the top-to-panel junction across the island.
Drag to look · wheel or pinch to zoom · arrow keys to look · + / − to zoom · Home to reset
YOUR INSPECTION
What deserves a closer look?
Every number on the main image opens its visual explanation above. Drawings reveal concealed systems and alternative construction.
0 / 24 reviewed
Open a detail, work through its inspection checks, then reveal the fabrication drawing.
Complete field notes · all 24 details
Edges & pattern
Waterfall miter
Close-up of a waterfall miter, using the reference kitchen's stone and oak palette.
The countertop turns down to the floor through a mitered junction. Inspect both the corner and the vertical panel; the floor fit is a separate decision.
Accurate cuts, sound bonding and careful handling protect the thin miter edges. A waterfall panel does not by itself establish a safe seating span.
- Dry-fit the top and panel before bonding.
- Check alignment, chips, adhesive color and the finished arris.
- Confirm panel support and floor clearance in the approved detail.
Check yourself: Can you trace an even joint and follow the pattern around the corner?
Mitered built-up edge
Physical sample illustrating a mitered built-up edge. This is an alternative construction, not a confirmed detail of the reference kitchen.
A mitered apron makes a slab look thicker at its exposed edge. Two angled cuts meet at the corner; the apron stops below the top instead of continuing to the floor.
Visible edge height and actual slab thickness are different. Check the return, backing and cabinet clearance rather than assuming a thick-looking edge is solid.
- Confirm stock thickness, finished edge height and the return detail.
- Dry-fit the bond line along the full length.
- Check drawer and door clearance below the apron.
Check yourself: What makes this a built-up edge rather than a waterfall?
Edge profile & arris
Close-up of an eased edge and softened arris.
The profile shapes the exposed edge: eased, bevel, bullnose, pencil or ogee. The arris is the intersection of two faces, usually softened to the specified finish.
A profile changes the shape of an edge. A miter or lamination changes its apparent thickness. The profile, finish and corner treatment must suit the selected material.
- Match the approved profile sample and material requirements.
- Inspect for chips, flat spots, tool marks and uneven polish.
- Confirm exposed ends and outside corners receive the specified finish.
Check yourself: Does the profile stay consistent through corners and transitions?
Laminated built-up edge
Physical sample illustrating a flat laminated stone edge strip and its horizontal bond line.
A strip bonded beneath the slab builds up the edge. The horizontal bond line remains on the face, unlike the diagonal corner joint of a miter.
This is a stone edge build-up, not a laminate countertop. Color, thickness and alignment of the strip affect the finished appearance.
- Check strip orientation, thickness and compatible bonding products.
- Dry-fit and inspect the bond faces before assembly.
- Review the finished profile and visible glue line against the sample.
Check yourself: Where will the glue line be visible after the edge is profiled?
Vein matching & layout
View of vein continuity across a waterfall junction; not an approved slab layout.
Vein matching arranges pieces so the pattern flows across a seam or around a waterfall. Book-matching creates a mirrored composition using suitable paired faces.
Approve the actual slab layout before cutting. A mirrored pattern and a continuous pattern are different outcomes, and either can consume additional material.
- Inspect the actual slabs, orientation and usable area.
- Allow for kerf, trimming and the chosen edge assembly.
- Record the approved layout and piece identification.
Check yourself: Would the pattern still align after the cutting kerf and miter cuts remove material?
Sinks & openings
Undermount sink cutout
Cutout detail showing an undermount bowl beneath the finished stone opening.
An undermount leaves the finished stone cutout exposed. The reveal describes how the stone edge aligns with the sink rim: positive, flush or negative, as agreed for the sink.
Use the actual model and approved template. Smooth internal radii and adequate stone around the opening matter; the sink support is a separate assembly.
- Confirm sink model, template, orientation and reveal.
- Inspect internal corners and the polished edge for chips or notches.
- Check clearances for mounting hardware and faucet connections.
Check yourself: Do the reveal and corner shape match the approved sink detail?
Faucet & accessory holes
Illustrative installation view: inspect the faucet hole, rear deck and fixture position against the selected hardware.
Faucet, soap-dispenser and air-switch holes need confirmed centers and diameters. Their hardware also needs room below the countertop.
A correct hole diameter can still produce an unusable installation if the handle hits the backsplash or the mounting nut conflicts with the sink.
- Use the selected fixture specifications and approved hole schedule.
- Check handle swing, backsplash distance and spout reach.
- Check under-counter nuts, hoses, sink rim and cabinet obstructions.
Check yourself: Can the fixture operate and be serviced above and below the stone?
Cooktop cutout & rails
Illustrative installation view with the appliance removed so the cutout and remaining stone are visible.
The cooktop hides a large opening. The strips of stone remaining in front and behind it are rails, which need support through machining, handling and installation.
Match the appliance and surface instructions for radii, clearances, heat and ventilation. An appliance fitting into an opening does not establish that the installation is correct.
- Confirm the exact appliance cutout and installation instructions.
- Review corner radii, rail widths, nearby seams and support.
- Keep the specified ventilation and heat clearances.
Check yourself: Where is the least stone left, and how will it be protected?
Drainboard grooves
Illustrative drainboard close-up: all three channels open into the bowl. Verify allowed groove geometry, fall and remaining thickness for the actual surface.
Optional shallow grooves beside a sink direct water toward the bowl. Their layout, fall, depth and finish must be compatible with the chosen surface.
Machining removes material. Groove depth and remaining thickness require approval; a decorative groove that traps water does not perform as a drainboard.
- Confirm the detail is allowed for the material and thickness.
- Coordinate groove layout and fall with the sink opening.
- Check the finished channels for roughness and standing water.
Check yourself: Do the channels drain toward the bowl without leaving a weak section?
Backsplash outlet cutouts
Illustrative panel sample shows the stone cutout before electrical fitting and cover-plate installation.
A full-height slab backsplash may need openings for electrical boxes and switches. Capture their actual positions and coordinate cover plates and finished wall thickness.
Outlet openings leave vulnerable internal corners and narrow strips in a large panel. Electrical fitting and code compliance belong with the qualified electrical trade.
- Field-check box locations and the finished surface plane.
- Confirm material-specific corner radii and distances to panel edges.
- Coordinate box extensions, access and cover plates before cutting.
Check yourself: Will the box and cover plate fit after the stone is installed?
Seams & walls
Countertop seams
Illustrative seam close-up: inspect joint appearance, plane alignment and pattern continuity under useful light.
A field seam joins separate countertop pieces. Plan its position against slab size, access, pattern, cutouts and support before the job reaches installation.
Dry-fit the joint and use the specified adhesive system. Check joint width, height difference (lippage) and appearance against the material requirements. Do not assume every surface permits face polishing at a seam.
- Approve seam locations and pattern before cutting.
- Check clean prepared edges, dry fit and support beneath the joint.
- Check adhesive cure, lippage and cleanup using the approved method.
Check yourself: Is the joint supported, aligned and acceptable under normal viewing light?
Backsplash & wall panels
Backsplashes protect the wall above the countertop. A short slab backsplash and a full-height panel have different measuring, handling and installation demands.
The main teaching view shows a slab backsplash. Its layout must coordinate wall condition, panel joints, finished ends, outlet openings and support.
- Confirm short or full-height design and the actual wall condition.
- Coordinate panel joints, outlets, window returns and finished ends.
- Check substrate, compatible adhesive and the perimeter seal detail.
Check yourself: Which edges and returns remain exposed after the cabinets and appliances are in?
Scribing to the wall
Illustrative dry-fit view before the backsplash is fitted: transfer and verify the wall contour while retaining the specified allowance.
Scribing transfers the actual wall contour to a countertop or panel edge. A wall that looks straight can bow or meet another wall out of square.
Maintain the specified perimeter allowance while fitting the contour. Forcing the stone tightly into the wall can create stress; a tight-looking finish is not permission to omit movement clearance.
- Compare the template with the finished wall before adjustment.
- Mark and verify the contour before removing material.
- Dry-fit again, retaining the required clearance and finished coverage.
Check yourself: Have you allowed for the real wall shape and the specified joint?
Perimeter & change-of-plane joints
Illustrative perimeter-joint close-up. Confirm the specified sealant, preparation and clearance for the actual materials.
Countertop-to-wall and countertop-to-backsplash junctions serve a different purpose from rigid slab seams. Their clearance and sealant must accommodate the specified movement and exposure.
Rigid seam adhesive and flexible sealant are not interchangeable. Confirm compatibility, joint preparation and cure requirements for the selected surface and adjoining material.
- Identify every wall, panel and change-of-plane junction.
- Retain the prescribed clearance and prepare clean bond surfaces.
- Apply the compatible sealant detail without locking the top against the wall.
Check yourself: Which junction here needs a flexible seal rather than a rigid seam bond?
Support & fit
Seating overhang
Illustrative support arrangement beneath a seating projection. Support design, spacing and capacity must suit the actual surface and cabinet structure.
A seating edge projects beyond the cabinet. Its finished surface does not reveal how the load reaches the structure below.
Concealed steel can transfer load back to structural cabinetry when correctly designed and anchored. Material, thickness, projection, cutouts and support spacing all affect the required detail.
- Confirm the material-specific support requirements and approved design.
- Check support depth, spacing and anchorage into structure.
- Verify the support is installed before the countertop takes load.
Check yourself: Follow the load back to the cabinet. Where does the support anchor?
Cabinets, flatness & shimming
Illustrative cabinet preparation: check the supporting plane before fitting stone. A still image does not establish flatness or level.
The cabinets form the countertop support. Check their condition, anchorage, alignment and supporting plane before placing stone.
Level and flatness describe different things. A support can be level at its ends but dip between them. Correct unsuitable cabinetry before using the stone to bridge the problem.
- Confirm cabinets are fixed, complete and match the template.
- Check the full supporting plane with suitable measuring tools.
- Use approved shimming and bedding details; correct larger cabinet errors first.
Check yourself: Does the entire support plane comply, or only the two ends?
Dishwasher & appliance spans
Illustrative appliance-bay support. Verify the structural connections and the selected appliance’s installation and service clearances.
An appliance bay interrupts the cabinet support beneath a run. The appliance is not automatically a structural support for the stone.
Review the spanning detail, nearby seams, heat and moisture protection, and appliance attachment method. Required brackets or rails must still permit installation and servicing.
- Locate unsupported openings and any seams above them.
- Confirm the specified rails, brackets or substrate and their anchorage.
- Coordinate appliance fixing, ventilation and removal clearance.
Check yourself: What carries the stone while the appliance is removed?
Sink mounting & support
Illustrative mounting assembly: padded rails carry the sink into cabinet-side attachments. Confirm the approved system and plumbing clearances.
An undermount needs a support system for the sink, water and contents. The seal at the rim and the structural support perform different jobs.
Use the sink and surface manufacturers' approved mounting system, such as a suitable cradle, rails or approved anchors. A bead of sealant alone is not a complete support design.
- Confirm the sink weight, cabinet arrangement and approved support system.
- Check mounting access, anchor compatibility and plumbing clearance.
- Verify the rim seal, cure time and independent load path.
Check yourself: Where does the filled sink load go after it leaves the rim?
Plan & hand over
Surface, thickness & finish
A full slab showing its surface, veining and stock edge. Confirm the exact material, thickness and finish from the job specification and slab records.
Confirm the exact surface product, actual slab thickness and finish. Natural stone, quartz, porcelain and solid surface need different fabrication and care decisions.
The room image cannot identify the material. Neither the stone pattern nor a tall edge proves a product or thickness. Use the job specification and actual slab records.
- Match the product, slab identification, thickness and finish to the order.
- Inspect the usable slab area and record visible defects or variation.
- Use the applicable fabrication, bonding, finishing and care instructions.
Check yourself: Can you name the material and stock thickness from documents rather than appearance?
Island size & access
Reference kitchen overview: study the island footprint and possible access route. Dimensions, piece weights and clearances require field verification.
The island is often the largest and most visible piece in the job. Its dimensions, waterfall panels and seating projection influence fabrication and installation.
The biggest piece a slab can yield may not fit through the building. Access, handling equipment, assembly sequence and seam layout must be resolved together.
- Check slab yield and the approved island dimensions.
- Survey doors, turns, stairs and the final positioning space.
- Plan lifting, protection, panel assembly and installation sequence.
Check yourself: Could the finished island reach this position through the actual carry route?
Long runs & inside corners
Illustrative long run and inside corner. Resolve corner geometry, seam layout and support for the specified material.
A run follows the wall and may turn through an inside corner. Its length alone does not determine a safe one-piece layout.
Review corner radii, seam positions, cutouts, support and access as one plan. Do not force a rigid L-shaped piece to fit a room that differs from the template.
- Verify lengths, returns and actual corner angles.
- Coordinate approved seams, inside radii and openings.
- Check support and dry fit before bonding any piece.
Check yourself: Where would a long run bend or bind during installation?
Field template & shop drawing
Illustrative templating setup. The approved shop drawing must record dimensions, fixtures, joints and fabrication decisions.
The field template records the actual kitchen. The shop drawing adds edge profiles, seams, reveals, hole centers, overhangs, backsplashes and piece orientation.
Resolve changes before cutting: cabinet movement, a different sink, revised edge height or relocated outlets can invalidate otherwise accurate measurements.
- Verify site readiness, dimensions and every actual fixture model.
- Record exposed edges, support, joints, cutouts and finished clearances.
- Approve and version the drawing; communicate changes to shop and site.
Check yourself: Could another person fabricate this job from the approved drawing without guessing?
Cutout protection & handling
Illustrative handling setup. Temporary bracing helps protect vulnerable cutout rails; equipment choice and the handling plan must suit the actual piece.
A finished top with large openings needs a handling plan from machine to rack, truck and final position. Narrow rails and mitered corners need particular protection.
Temporary bracing or material-specific reinforcement may be required. Rodding or reinforcement is not a universal repair for a poor layout and does not replace installed structural support.
- Plan the load, route, rated equipment and trained crew.
- Protect corners and support openings with the approved handling system.
- Inspect the piece after each transfer and before final positioning.
Check yourself: How is the weakest section supported at each transfer?
Final inspection & care
Final inspection of the finished surface and edge, with care information ready for handover.
Inspect the completed installation against the approved drawing: fit, seams, edge finish, cutouts, supports, seals and visible damage. Record unresolved items before handover.
Care follows the actual material. An impregnating sealer may be appropriate for absorptive natural stone; it does not prevent etching. Quartz and porcelain generally do not require that treatment.
- Check dimensions, lippage, finish, support and seals under useful lighting.
- Use approved cleanup methods and respect adhesive and sealant cure times.
- Provide material-specific cleaning, heat protection and sealing advice; record sign-off.
Check yourself: Can you explain the care routine and identify anything that still needs correction?
Conceptual details for learning, not a fabrication specification. Confirm dimensions, material limits, support design and anchorage with the applicable manufacturers and a qualified countertop professional. Images are illustrative.